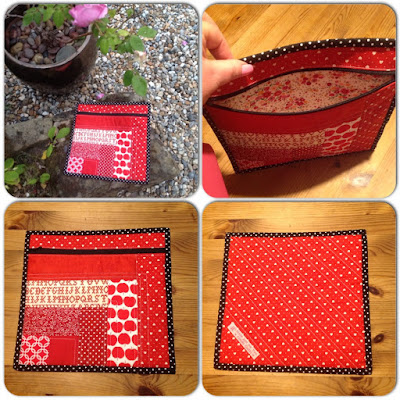
Showing posts with label Tote Bag. Show all posts

Sunday, 12 March 2017

Gifts for 'Chernobyl' children 2017 ...

Please see these two posts from last year for the tutorials for a patchwork tote bag and table mat. The ladies who volunteered to help me make each of the 17 children visiting North Wales from Belarus / Ukraine a bag and mat were very kind and very talented.


Here are the lovely children (and helpers) with their bags last Summer:


They absolutely loved their gift bags - each contained a table mat to take home to their Mother / Grandmother, a patchwork bag, some sweets and either a tissue holder or wallet.

They were such a hit, Gerrie (chair of the North Wales Chernobyl Children's Lifeline), asked me if we could do it again this year. Of course we can - as soon as I put the request out on my Instagram for this year's group of children, I had a host of wonderful quilters ready to sign up again. 

The requirements are the same as last year - if you can make a bag and mat - great - if you can only make one - that's also fantastic. We have 22 volunteers this year and 14 children (aged between 9 and 11: 12 girls and 1 boy - and an older boy who is 14) so any extras will be gifted to the helpers and / or given to the children with siblings back home.

A nice size finish for a tote bag is 14" long by 12" wide with nice long handles (27") and a table mat 16" square or bigger would be lovely.

This year, I have varied my makes and I used a Moda Charm Pack (generously gifted by one of my dear IG friends, Katrina) to make two tote bags - one for one of the children and one for one of the helpers:


I have made a slightly larger table mat - 20'5" x 20.5" - which I quilted with Aurifil Rainbow thread (it's my new favourite now):


Nothing will go to waste - everything we make will be so gratefully received, I promise you.

Thank you all so very much - I will tag all my helpers for 2017 on Instagram  - please use the hashtag #ccllnorthwalesquiltbee - and I have created a link up so the bloggers can share their makes here:


Saturday, 4 June 2016

Great tutorials :)

I have a few little finishes to share with you this week; a patchwork tote bag, a small table mat, a one-hour basket and a simple zipper bag. The first two I made are for a charity I have recently got involved with - Chernobyl Children's Lifeline (CCLL North Wales) - and I put together a tutorial for the bag here and the mat here.


A little reminder of the work CCLL North Wales do: they are part of a national charity that helps children living in Belarus and Northern Ukraine who still suffer the effects of low level radiation some 30 years after the nuclear accident in Chernobyl. They are bringing 17 children (12 girls and 5 boys) to North Wales this July to stay with Host Families - whilst here, the combination of uncontaminated food, fresh air and sunshine, exciting trips out and lots of exercise does the children a power of good. 

I met the local chair recently (Gerrie) at a talk she was giving  - she was incredibly inspiring and passionate about her work - this drew me to her and so I introduced myself. I told her I was a hobby quilter and asked what could I do to help. We agreed a tote bag and a small table mat would be perfect gifts for the children and their families. Knowing I couldn't possibly make all of this by myself (as fast as I am!), I put out a request on Instagram and got 16+ volunteers within hours - I was thrilled at the wonderful response. 

Please do search the tag #ccllnorthwalesquiltbee on Instagram to see what 'my gals' have been making. 


Then yesterday, I made my sister a one-hour basket using Kelly @ Kelby Sews' tutorial:


And I got swept up by all the recent #simplezipperbag posts on Instagram, and made this cute bag following (with just a little variation) the YouTube tutorial from Fat Quarter Shop:


All these projects are great to make (including mine!); even better to give away and also are wonderful form of therapy when you just want / need to sew little things quickly. Thank you to all the quilters who share their time and creativity in whatever way to make life just a little bit easier for someone else - someone they've never even met but share this passion with.


Linking up with Amanda Jean @crazymomquilts and Sarah @confessionsofafabricaddict.


Happy weekend :)

Monday, 30 May 2016

Chernobyl Children's Quilt Bee - Part 2 :)

** Linking up with Lorna @sewfreshquiltsquilts **

Hello all - so please see yesterday's blog post which was all about the charity - Chernobyl Children's Life Line (CCLL) and the new Quilt Bee I've formed for the lovely ladies who've volunteered their time and fabric to help me make 17 children and their families a couple of quilty gifts to take back home to Belarus. The children will be coming to North Wales for a few weeks in July so we only have until then to make the gifts ... no pressure, then!

My Instagram post has the names of these wonderful quilters - they are such a talented and kind-hearted bunch and live as far away as USA and Australia ... I'm in the UK, as are the majority of the volunteers ... so this really does feel like an international endeavour.

There are 12 girls (aged 9 upwards) and 5 boys visiting. Gerrie (the Chair) and I spoke about what to make and she said the children would love a patchwork tote bag. I'm not sure the 5 boys would ... will have to think of something else for them (maybe a lined drawstring bag - or as I call them a 'Pants Bag')?

If any of the 16 ladies want to make a boy's gift, please let me know - if not, I am happy to make the 5 Pants Bags and I know for sure that none of the girls' Tote Bags you make will go spare ... these families really have very little.

On with the tutorial. Like yesterday, though, please do feel free to make a bag using your own pattern and techniques; this is just how I made mine today. Please do skip the bits you know with your eyes closed but I'm writing this for at least one lady who asked me to 'keep it easy!'

Finished dimensions can vary but I think a finish of 14" long and 12" wide with 27" long handles should suit most of the girls. 1) I started with 6 pairs of 2.5" strips and cut them to 9" and sewed them together - 6 on each side mixed up a bit - this should make a 12.5" x 9" block:


2) Cut co-ordinating purple strips 2 x 12.5" by 2" for the bag top and 1 strip for the base of the bag - 12.5" by 8":


3) Sew the 2" strips to the top of each block and the base strip to one of the blocks:


4) Then sew the bottom of the other block to the base - if you have chosen directional fabric - this will now be upside down - don't worry it's supposed to be:


5) Baste this piece - you can use Pellon 987f (fusible fleece) for this - I didn't but I have read this is very good for bags. I just used an off-cut of batting (wadding).

Quilt as desired.


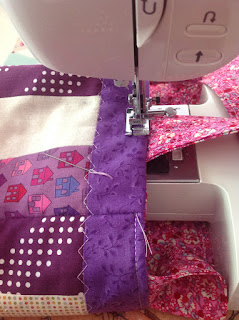
6) I used a zigzag stitch at the base of the bag - sewn at 1" intervals (marked using Hera Marker) and one line at the top of the bag. You can quilt however you like - mine is minimal but I feel it does need some quilting for extra stability (and prettiness!) 


7) So far, I have just used fabric scraps but you are going to need a larger piece of fabric for the lining and handles (unless you choose to mix and match (up to you).


I had some gorgeous pink in my stash - from this, I cut one continuous piece - 12.5" wide by 28" long for the lining:


and 2 x 28" long by 5" wide fabric for the bag handles.

8) You'll need a bit of batting - I keep off-cuts trimmed from quilts especially for bag handles - you'll need - 2 x 28" long x 1.25" 

NOTE: my handles are quite 'chunky' and have finished at 2" wide - you may prefer them narrower but, personally, using this method, I wouldn't cut smaller than 4":


9) Fold in half length ways, then press - then fold a 1/2" on each side and press. Then put the batting inside, fold in half and press again:


10) I used the same thread I used for quilting to then straight line stitch just under a 1/4" on each side of the handle.

I also put an extra zigzag stitch down the middle for more stability: 


11) Placing right sides together, you are going to sew your bag and lining down both sides - a generous 1/4" should be fine and don't forget to secure the start and finish with some extra stitches.

SORRY - photo comes later but (I also sewed a 6.5" pocket (and label) to one side of the lining).

NOTE: you will have to leave a 5" gap (not sewn) on one side of the lining - don't have it too close to the bottom because you will be boxing the corners next:


12) I boxed my corners at just under 2" and trimmed off the excess. I have read that to leave them on gives the bag more stability; I choose to trim at just over 1/4":


13) I marked where I wanted the handles with a pen:


14) Lay your handle down like this, pick up and place in the bag without twisting: 


15) And pin where your marks are:


16) Do the same with the other handle. You can see it better in the next picture but you do need to make sure your handles are slightly sticking up above the bag:


17) Turn your lining so that it is the right way around and drop it into your bag; right sides will now be facing each other. Pin the lining to the bag at the side seams so that they match up, pin in the middle on each side, then gently unpin the handles and re-pin so that you now have the lining pinned too: 


18) You'll need to sew slowly now - well, I go slowly - and you may need your walking foot. My Juki doesn't mind the bulk so she will happily sew through all the layers - I give the start and end of each handle a few extra stitches to secure:


19) Now, pull the bag gently through the gap in the lining you left:


20) It doesn't look like it'll work - but it does:


21) I sew the lining shut by just machine sewing about an 1/8th of an inch from the edge - you may want to finish this differently but I think it's very tidy and it won't be seen in the bag:


22) Nearly there - I promise - now you are going to top stitch the bag (between 1/8 and 1/4") being careful not to catch the handles. Again, I go slowly here.

I also like to start and finish by burying the knot but please do what you prefer:
And here she is: one Patchwork Tote Bag for a little girl to take back to Belarus in July:


I hope you found the tutorial helpful - and please will you link up your finishes? It would be lovely for everyone to see all the different creations. Thank you.


Friday, 22 August 2014

Made a bag, got a bag :)

Like many quilters and bloggers, I am enjoying a very busy Summer and I'm not getting much sewing or blogging done ... but that's okay, hey? 

Last week I made a tote bag for Angie (a friend of the family) to say thank you for gifting us these fabby brass jugs for our new house:


I love making these tote bags. Angie said she liked rose pinks so I raided my stash / scraps and here are some of my 'along the way' photos:


And it doesn't matter how many times I get to this part, it always makes me smile because I think, 'no way this is going to work' ... but it does:


So that was the gift I made and this was the gift I got from my dear blogging friend Jennie over at Porch Swing Quilts - she makes amazing bags (you must check out her 'Weekender' bags) and she sent me the bestest little Sew Together Bag - look at those 3 delightful zipped pouches:


And see what she added on the front - a Glinda wand! She makes all these beautiful things AND has 5 little ones to look after - SuperWoman indeed! Thank you sooooooo very much, Jennie, I adore it! You're incredibly thoughtful and I'm sending you a big hug all the way to North West USA from here in the UK (North Wales) x

Linking up with Amanda Jean @ Crazy Mom Quilts and Sarah at Confessions of a Fabric Addict.

Enjoy the rest of the Summer - I will :) 

Friday, 4 July 2014

A couple of finishes and a farewell :)

So before all my fabric and sewing machines were all packed away and taken to the new house in Wales on Wednesday, I did manage to squeeze in two final projects. This one started out as a cushion for my friend's son's teacher but I wasn't feeling it so I turned it into a shopping bag for me! You have to pay 5p per carrier bag in Wales so this bag should carry plenty of bags when we go shopping:


A little pocket inside for more bags! I do love to shop :)


And here is the finished cushion:


And here is my empty sewing room ... gulp! 


Very excited about unpacking them -15 boxes in the new house on Sunday and creating a whole new sewing space ...

Linking up with Amanda Jean and Sarah :)