** Linking up with Lorna @sewfreshquiltsquilts **
Hello all - so please see yesterday's blog post which was all about the charity - Chernobyl Children's Life Line (CCLL) and the new Quilt Bee I've formed for the lovely ladies who've volunteered their time and fabric to help me make 17 children and their families a couple of quilty gifts to take back home to Belarus. The children will be coming to North Wales for a few weeks in July so we only have until then to make the gifts ... no pressure, then!
Hello all - so please see yesterday's blog post which was all about the charity - Chernobyl Children's Life Line (CCLL) and the new Quilt Bee I've formed for the lovely ladies who've volunteered their time and fabric to help me make 17 children and their families a couple of quilty gifts to take back home to Belarus. The children will be coming to North Wales for a few weeks in July so we only have until then to make the gifts ... no pressure, then!
My Instagram post has the names of these wonderful quilters - they are such a talented and kind-hearted bunch and live as far away as USA and Australia ... I'm in the UK, as are the majority of the volunteers ... so this really does feel like an international endeavour.
There are 12 girls (aged 9 upwards) and 5 boys visiting. Gerrie (the Chair) and I spoke about what to make and she said the children would love a patchwork tote bag. I'm not sure the 5 boys would ... will have to think of something else for them (maybe a lined drawstring bag - or as I call them a 'Pants Bag')?
If any of the 16 ladies want to make a boy's gift, please let me know - if not, I am happy to make the 5 Pants Bags and I know for sure that none of the girls' Tote Bags you make will go spare ... these families really have very little.
On with the tutorial. Like yesterday, though, please do feel free to make a bag using your own pattern and techniques; this is just how I made mine today. Please do skip the bits you know with your eyes closed but I'm writing this for at least one lady who asked me to 'keep it easy!'
Finished dimensions can vary but I think a finish of 14" long and 12" wide with 27" long handles should suit most of the girls. 1) I started with 6 pairs of 2.5" strips and cut them to 9" and sewed them together - 6 on each side mixed up a bit - this should make a 12.5" x 9" block:
2) Cut co-ordinating purple strips 2 x 12.5" by 2" for the bag top and 1 strip for the base of the bag - 12.5" by 8":
3) Sew the 2" strips to the top of each block and the base strip to one of the blocks:
4) Then sew the bottom of the other block to the base - if you have chosen directional fabric - this will now be upside down - don't worry it's supposed to be:
5) Baste this piece - you can use Pellon 987f (fusible fleece) for this - I didn't but I have read this is very good for bags. I just used an off-cut of batting (wadding).
Quilt as desired.
6) I used a zigzag stitch at the base of the bag - sewn at 1" intervals (marked using Hera Marker) and one line at the top of the bag. You can quilt however you like - mine is minimal but I feel it does need some quilting for extra stability (and prettiness!)
7) So far, I have just used fabric scraps but you are going to need a larger piece of fabric for the lining and handles (unless you choose to mix and match (up to you).
I had some gorgeous pink in my stash - from this, I cut one continuous piece - 12.5" wide by 28" long for the lining:
and 2 x 28" long by 5" wide fabric for the bag handles.
8) You'll need a bit of batting - I keep off-cuts trimmed from quilts especially for bag handles - you'll need - 2 x 28" long x 1.25"
NOTE: my handles are quite 'chunky' and have finished at 2" wide - you may prefer them narrower but, personally, using this method, I wouldn't cut smaller than 4":
9) Fold in half length ways, then press - then fold a 1/2" on each side and press. Then put the batting inside, fold in half and press again:
10) I used the same thread I used for quilting to then straight line stitch just under a 1/4" on each side of the handle.
I also put an extra zigzag stitch down the middle for more stability:
11) Placing right sides together, you are going to sew your bag and lining down both sides - a generous 1/4" should be fine and don't forget to secure the start and finish with some extra stitches.
SORRY - photo comes later but (I also sewed a 6.5" pocket (and label) to one side of the lining).
NOTE: you will have to leave a 5" gap (not sewn) on one side of the lining - don't have it too close to the bottom because you will be boxing the corners next:
12) I boxed my corners at just under 2" and trimmed off the excess. I have read that to leave them on gives the bag more stability; I choose to trim at just over 1/4":
13) I marked where I wanted the handles with a pen:
14) Lay your handle down like this, pick up and place in the bag without twisting:
15) And pin where your marks are:
16) Do the same with the other handle. You can see it better in the next picture but you do need to make sure your handles are slightly sticking up above the bag:
17) Turn your lining so that it is the right way around and drop it into your bag; right sides will now be facing each other. Pin the lining to the bag at the side seams so that they match up, pin in the middle on each side, then gently unpin the handles and re-pin so that you now have the lining pinned too:
18) You'll need to sew slowly now - well, I go slowly - and you may need your walking foot. My Juki doesn't mind the bulk so she will happily sew through all the layers - I give the start and end of each handle a few extra stitches to secure:
19) Now, pull the bag gently through the gap in the lining you left:
20) It doesn't look like it'll work - but it does:
21) I sew the lining shut by just machine sewing about an 1/8th of an inch from the edge - you may want to finish this differently but I think it's very tidy and it won't be seen in the bag:
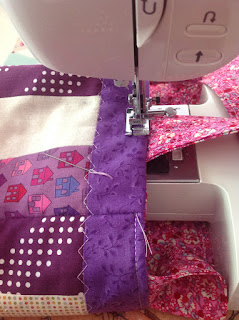
22) Nearly there - I promise - now you are going to top stitch the bag (between 1/8 and 1/4") being careful not to catch the handles. Again, I go slowly here.
I also like to start and finish by burying the knot but please do what you prefer:
And here she is: one Patchwork Tote Bag for a little girl to take back to Belarus in July:
I hope you found the tutorial helpful - and please will you link up your finishes? It would be lovely for everyone to see all the different creations. Thank you.


